Key Takeaways
- The article answers the core question directly and explains the main variables that affect the outcome.
- It breaks the topic into practical decision factors so readers can understand the trade-offs clearly.
- Examples and scenarios help translate the concept into real-world buying or setup decisions.
- The takeaway is a more confident decision based on compatibility, performance, and value.
Imagine being able to construct a garden shed or shop that can run entirely on solar power. This can be a reality for you, as long as you have the know-how and the motivation. Building an off-grid shed gives you plenty of opportunities to save money in the long run since you won’t have to run a power line out to it.
This project can seem overwhelming at first, especially when it comes to knowing which equipment and materials to purchase. You are invited to continue below to find out just how easy it is to build a reliable solar array.
How To Size A Solar Panel For Your Shed
Any error during the sizing process will leave you with a sunk cost. It’s generally pretty hard to undersize a solar panel for a shed. The biggest concern here is that you end up throwing too much money into a system that ends up giving you much more energy than you need.
There are two components to consider during the sizing process: the photovoltaic panel and the battery bank. The latter of these will enable you to draw power during the times when the sun seems to be in hiding.
The Louisiana DNR has provided a working example that takes you through all the calculations necessary to determine 100% accurate off-the-grid PV system sizing. You’ll need to know measures such as component voltage, inverter efficiency, and design tilt.
Calculate How Much Power You Need
Start by making a list of all the appliances that you will be using in your shed. Perhaps you have LED lights, a small fridge, a radio, a heater/cooler, and a few power tools. If you are looking for a backyard studio space, then you probably have a more exhaustive list.
In one column, list the wattage and, in the other column, the average number of hours used. If you live in a temperate climate, creating a separate list for summer and winter could be beneficial. The wattage requirements for appliances can typically be found in either the owner’s manual and/or on the item itself.
If you multiply the quantity of any specific item times the wattage times the hours, then this will yield the number of wattage hours per day. Dividing this number by 1000 will give you the kilowatt-hours/day (kWh/day).
Size The Panels
Sizing the solar panels is a little bit more complicated for an off-grid system than it is for a grid/solar panel combo system. This is because you have the added variable of local climate to account for.
- Divide the number of Wh/day by the expected number of sunlight hours per day.
- Divide this number by the expected system losses.
- Multiply this number by 30 days to get the number of watt-hours per month.
Size The Battery
You will also need to size the battery correctly. This will enable you to draw from a bank of excess power during dark, cloudy days and when the wind is excessive. This system could be your lifeline if you plan on doing a lot of work in your shed during cold winter days.
The calculation for battery sizing is relatively simple:
- To find battery capacity (in terms of ampere-hours (Ah), you will divide: Total watt-hours per day/ (0.85 x 0.6 x the nominal battery voltage).
- Then multiply this number by the max number of days that you want to be able to use the shed without having enough sunlight to refresh the battery bank.
- For a shed, the number of days of autonomy will probably be relatively small (perhaps ½ a day or one full day).
What Equipment Do You Need To Bring Your Shed Off The Grid?
There are several tools and pieces of equipment you need other than just the panels and the battery. In the sections below, you’ll see what is needed for a DIY installation of solar panels.
Here is the order of the equipment needed from the roof to the plug of your equipment:
- Solar panels and mounting kit
- Charge Controller
- Fuse Box (to separate voltage into multiple circuits)
- Batteries
- Inverter
- Power Strip (optional)
Charge Controller: What Is It? Is It Worth It?
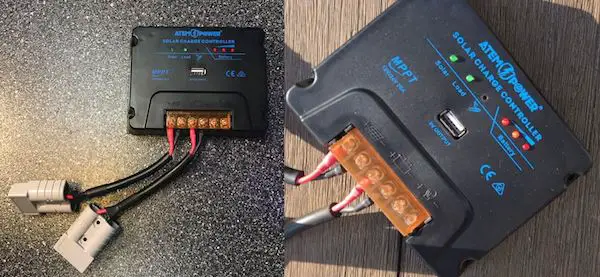
The charge controller is responsible for regulating the current flow from the solar panels so that the battery does not become damaged. There are two different types of charge controllers in solar power: PMW controllers and MPPT controllers.
- PWM: Pulse Width Modulation controllers are simpler and more affordable. They supply a constant trickle of power to the battery to keep it topped off.
- MPPT: With Maximum Power Point Tracking chargers, the voltages of the solar panel and the batteries do not have to match. These types of controllers are more efficient and better at maximizing power delivery versus PWM controllers.
Since you are aiming for an off-grid setup, you are encouraged to consider a charge controller.
If your shed were also connected to the grid, you wouldn’t necessarily have to worry as much about charge controllers. This will ensure that your battery does not get overloaded.
Inverter
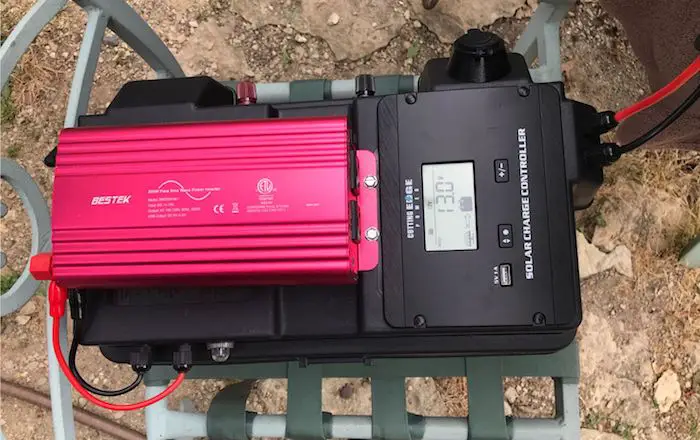
An inverter is necessary to convert DC electricity from the solar array to AC electricity that powers tools, appliances, and electronics. Inverters are sized according to wattage demands, so be sure that you are purchasing an appropriately sized inverter. If you buy a solar kit with an inverter already included, you won’t have to worry about this.
Battery Box
The battery storage system in an off-grid setup will be relatively heavy for its size, as is evidenced by this 20 Ah Deep Cycle Battery, which weighs just over 5 pounds even though it is 6.10″ x 3.03″ x 7.16″. You might consider building a battery box out of plywood to hold the battery system and keep it dry. A simple enclosure will do just fine and will go a long way in helping you keep your solar setup neat and organized.
Fuse Box
You are encouraged to reach out to a licensed electrician for help with the wiring network, which should include a fuse box if you plan on having multiple circuits spread out. On one circuit, you may have a heater. On another, you may have a refrigerator. It’s no different than the wiring system found in your home.
DIY Installation Tools Needed
Most of the tools needed for a DIY installation are tools that you probably already have. You’ll need standard tools such as an angle finder, a cordless drill and drill bits, a level, and various pliers and cutters, among other standard tools.
Since you’ll be doing electrical work, you’ll undoubtedly need a reliable AC/DC multimeter. You are encouraged to also purchase a solar pathfinder, which will help you evaluate the true solar potential at a given site. If you are unsure about any portion of the installation, you are certainly encouraged to seek the help of a solar professional in your area. Advanced electrical work should be performed by a licensed electrician.
Best Solar Equipment For Sheds
The following products include a solar panel kit, LiFePO4 battery, and an inverter, all of which are sized for an off-grid shed.
Renogy 400 Watt 12V Monocrystalline Solar Starter Kit
The Renogy 400 Watt 12V Monocrystalline Solar Starter Kit comes with four solar panels, a river charge controller, a 20 ft adapter kit, a travel cable, and four sets of Z-brackets. By going with a kit like this, you won’t have to worry much about finding all the right pieces.
If you have an RV that you also want to use for off-the-grid adventures, then you may consider this kit for that as well. The kit comes with cables and adapters that allow you to place your solar array in a prime location while still being able to reach your shed or RV. The kit is portable, which can be advantageous if you only use your shed seasonally.
Renogy also has a 200W starter kit that I’ve reviewed in this post. It goes into detail on what’s included and I compare it to other similar kits.
Renogy 175W Monocrystalline Solar Panel
The Renogy 175 Watt Panel offers a step up in size for those with power demands that exceed what a 100-watt system can offer. The company also conveniently packages 200-watt and 160-watt alternatives to this product. This monocrystalline panel does carry many of the same characteristics as the Solperk 100W listed above, with a few key perks added.
One nice feature is that the panel comes with pre-drilled holes for fast and simple mounting to either the ground or the shed roof. The junction box has been rated as IP-65, able to withstand dust and low-pressure water jets. Only the solar panel is included in the set.
Miady 12V 100Ah Deep Cycle LiFePO4 Battery
The Miady 12V 100Ah Deep Cycle Battery is a lithium iron phosphate battery, which will go approximately 2,000 cycles versus lead-acid batteries, which generally last 100-300 cycles. Another advantage of LiFePO4 is the flat discharge curve, which should mean that you’ll receive sustained maximum power all the way to the end of the cycle.
Renogy 1000W 12V Pure Sine Wave Inverter
The Renogy 1000W Inverter also comes in 700W to 3000W packages. The inverter includes 115V AC 60 Hz AC Outlets, so you can plug power tools directly into the inverter when looking for a reliable AC power source. A 5V USB power port can be used for charging phones, tablets, and other small electronics.
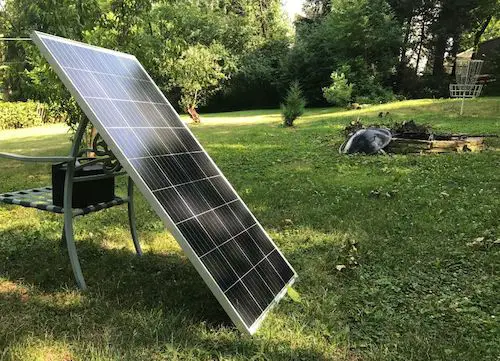
Mount Your Solar Panel
The conventional practice is to mount the solar panel on the roof, as this is the best location for receiving direct sunlight in many cases. A solar panel weighs about 3-5 lbs./ sq.ft, so you should have few problems in terms of being able to use your shed roof as the mounting surface for your solar system.
Select Direction And Tilt
In North America, all solar panels must face the south. The best direction to face is due south, although southwest and southeast will capture sunlight effectively, albeit with a 5% performance decrease. Tilt is also important.
A general rule of thumb for tilt is to have the solar panel tilted several degrees that are at least equal to your location’s latitude. To achieve maximum performance, you may tilt the panel gradually throughout the year. Since this is only for a shed and not a whole-house system, such preciseness may be overkill.
Mount The Solar Array
It is easy to make a costly mistake during the solar panel mounting process. You could inadvertently cause a leak in the roof when you drill through the rafters to install the rails that will hold the roof-mounted solar array.
Here are some guidelines for roof-mounting solar panels:
- A solar roof flashing is used to create a watertight seal at the points where the roof is drilled through.
- You are encouraged to spray sealant into the holes before driving the lag screws to ensure that the connection point is fully watertight.
- Lag screws are driven into the flashing to connect the rail to the roof.
You will need to install a roof flashing at the point where the wires will run from the solar array to the charge controller below. A conduit will be needed to carry the wiring. Make sure that the roof flashing for the electrical conduit is watertight, just like all the other roof flashers.
Ground Mount Solar Panels
You might consider doing a ground mount rather than placing your solar panel on your roof. This offers an advantage in that it won’t require you to climb the roof. The disadvantage is that the solar panel will be directly in the way of ground-level activities.
You can either design your ground mount kit or purchase a kit like this BougeRV Adjustable Solar Panel Tilt Mount Bracket Set. It’s essential to have an adjustable bracket so that you can change the tilt to meet direct sunlight.
How To Get The Most Out Of Your Solar Panels
You can expect Monocrystalline solar panels to last 25-30 years at the most. The most vulnerable portion of the panel is not necessarily the panel itself; instead, it is the wiring that connects the panel to the conduit.
- Make sure that you tuck wiring underneath the panels so that they will not be directly exposed to the elements.
- Install a lightning rod on your shed if you live in an area that frequently receives lightning.
- You are also encouraged to check if there are any solar incentives from local governments, which will further help you get a return on your investment.
Why You Should Have Off-Grid Power For A Shed
Even if the rest of your home is tied into the electrical grid or an electrical grid/solar backup system, it still makes plenty of sense to go full solar with your shed. It won’t take many panels to provide enough power, and it will still be much cheaper than having to run a power line out to a remote shed.
Having a power source for your shed gives you a lot of flexibility. Solar power enables you to have a fully working shop anywhere on your property. No longer will you have to lug all your gear up to your garage for repairs or maintenance. You’ll also have no problem keeping your shop warmed and cooled.
Perhaps you are looking for a remote home office or studio where a peaceful setting will better inspire you. A properly sized solar power source will provide you with all the electricity needed for your electronics.
How Much Does It Cost To Build An Off Grid Shed?
You can expect the solar array to cost $100-$500, as you’ll see with the cost of the products linked above. Some kits come with inverters and charge controllers, which will cost approximately $100-$300 in total if you have to buy these separately. In the end, you can expect to spend $1000 or more when you include wiring and labor costs. That’s why it’s essential to do things right the first time.
Final Thoughts
An off-grid solar power system for a shed should include a properly-sized solar array, a charge controller, a battery, an inverter, and a fuse box. To install off-grid power for a shed, you’ll need to know how to size the solar array for your power needs. A battery will also be necessary for an off-grid system since you will need to store energy for the times when the sun isn’t out. A charge controller is recommended to protect the battery