Key Takeaways
- This comparison highlights the key differences in wattage, portability, build style, and panel format.
- Charging compatibility, setup convenience, and real-world use cases help separate the better option.
- The article explains how the two products differ for camping, RV use, emergency charging, or fixed setup.
- The winner depends on whether the reader values compact portability, higher output, or easier deployment.
Renogy 200W Solar Starter Kit with 30A PWM — Best Solar Panel Kit for Sheds (2026)
The Renogy 200W Solar Starter Kit remains the top recommendation for shed solar in 2026. It includes two 100W monocrystalline panels (18–21% efficiency), a 30A PWM charge controller (the Wanderer), MC4 cables, and Z-bracket mounting hardware — everything needed to connect to a 12V battery bank and power your shed.
| Spec | Details |
|---|---|
| Panel Output | 200W total (2 × 100W monocrystalline) |
| Charge Controller | 30A PWM — Wanderer (adequate for 200W / 12V systems) |
| Included | MC4 cables, Z-brackets, connectors |
| Battery Compatibility | AGM, gel, flooded, lithium |
| Expandable | Yes — add more panels up to 400W |
| Amazon Rating | 4.6/5 stars (8,000+ reviews) |
| Price | ~$300–370 |
200W Solar Panel Kit Comparison (2026)
| Kit | Wattage | Controller Type | Panel Type | Price | Best For |
|---|---|---|---|---|---|
| Renogy 200W + 30A PWM (Wanderer) | 200W | PWM (30A) | Mono | ~$300–370 | Best overall |
| HQST 200W Kit | 200W | MPPT (30A) | Mono | ~$150–200 | Budget alternative |
| ECO-WORTHY 200W Bifacial | 200W | MPPT (30A) | Bifacial Mono | ~$200–280 | Best value with bifacial |
| Renogy 400W Kit | 400W | MPPT (40A) | Mono | ~$500–600 | Larger shed/workshop |
Note: The Wanderer 30A PWM controller included in this kit works well for basic 12V shed setups up to 200W. If you plan to expand beyond 200W or add lithium batteries, consider upgrading to a standalone MPPT controller (such as the Renogy Rover 40A) for 15–30% better efficiency.
Daily Production Estimates (200W kit, varies by location and season):
| Peak Sun Hours/Day | Daily Output | Battery Charged (100Ah/12V) |
|---|---|---|
| 3 hours (cloudy region) | ~480Wh | ~40% charge added |
| 4 hours (moderate) | ~640Wh | ~53% charge added |
| 5.5 hours (sunny region) | ~880Wh | ~73% charge added |
Installing the Renogy 200W Solar Starter Kit
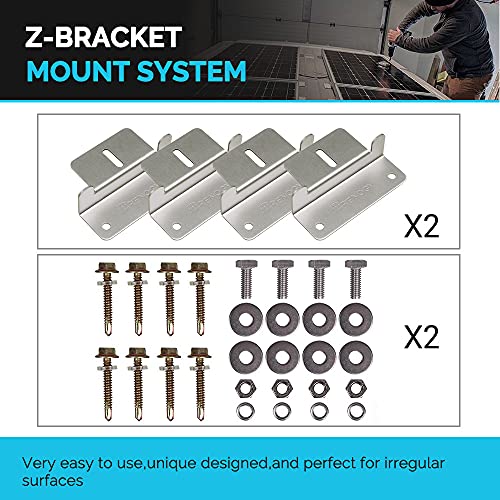
There are Z brackets to help hold the panels on the surface where they are to be mounted as well as screws, nuts, and bolts to secure the panels in place.
The entire setup is pretty much a DIY package. A guide is included, along with all the needed hardware. The pre-drilled holes on the back of the panels make for easy, fast, and secure mounting.
Even though installation will take time, it will save you installation costs from a third party.
Ideally, with little to average knowledge of electronics and connectivity, you can sort it out effectively.
There are several videos on YouTube on how to install solar, but the following video shows how to install a Renogy kit that is almost identical to the one I am reviewing now on an RV.
Although it’s not installed on a shed, it will give you a good idea of the tasks involved to put it together.
On the other hand, you could hire professionals to do the installation if you’d like as well.
Renogy also has a PDF installation guide for their solar panels that you can read here: Installation Guide for Photovoltaic (PV) Modules. This can be handy if you need exact specifications before installation.
Similar: Solar Panel Installation – Step-By-Step for Home and RV
What Do You Need for Solar Power in Your Shed?
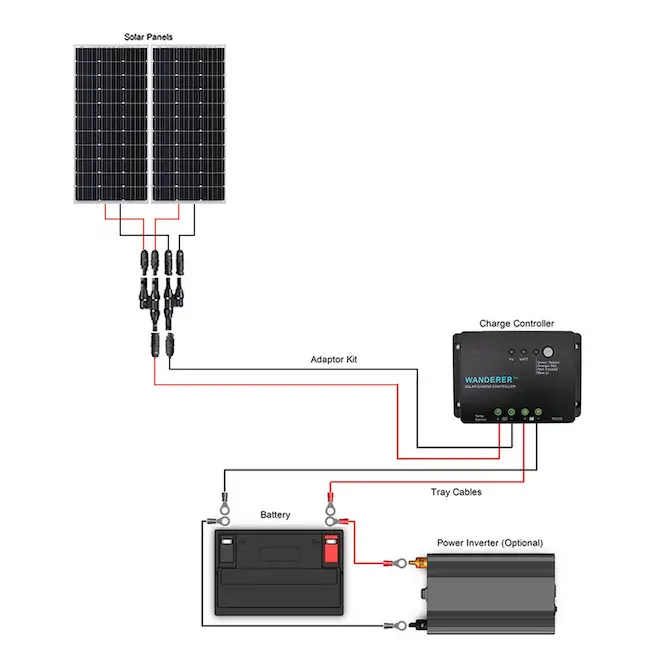
The main components you’ll need for solar power in your shed include solar panels, a charge controller, a fuse box (for DC appliances), an inverter (for AC appliances), and a battery. Once these are connected in the right order with properly gauged wiring, the system is complete.
The following video shows exactly how to connect each of the previously mentioned parts together. I forwarded the video to where the wiring begins:
The charge controller used in the video is different from the one that comes with the 200W Renogy kit, but it shares the same basic connections.
The Renogy kit does not come with a fuse box, battery, or inverter. These items are essential for off-grid power.
One of the benefits of the kit not including these components is the power to choose which inverter, battery, and fuse box best suits the power needs of your shed.
Another way to gather all of these components is through a solar generator or portable power station. A solar generator has a charge controller, inverter, and battery already within it. It has DC and AC ports and only requires solar panels to function properly.
I have an article that compares a DIY solar power system to solar generators to give you an idea of which may be better for you. Find the article here: Solar Generator vs Battery – Which Is Ideal?.
Kit Expansion– Customizing the Solar Panel Setup for Your Shed
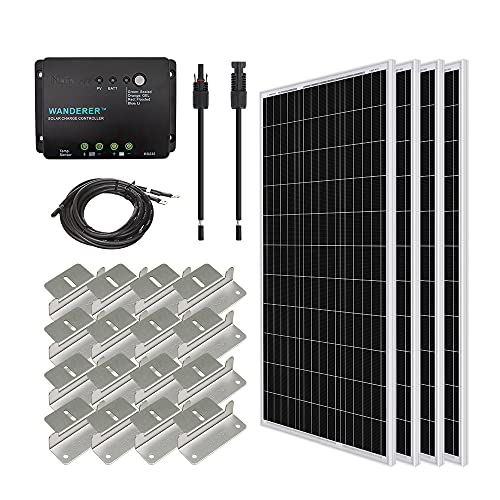
In any DIY solar-powered system, there will be some (or a lot) of room for customization.
In essence, you could add batteries as you deem necessary or increase the amount of power you store by adding more solar panels to what you have originally packed in the Renogy starter kit.
For example, you could extend the solar panels up to 400 watts from the original 200 watts by adding two extra 100-watt panels.
Renogy sells a kit like this and it is essentially the same as the 200W starter kit but with two additional solar panels. You can find it here on Amazon (affiliate link).
With this, you must be sure that your roof is capable of bearing the weight of the extra panels before mounting them.
In total, four Renogy monocrystalline panels will weigh about 70 pounds.
Renogy alone has dozens of additional kits to choose from. They have all sorts of charge controllers and solar panel configurations depending on how much power you need. You can browse all of their kits on Amazon here.
Complete Solar Power Kits for Your Shed
If you’re looking for complete solar kits with all necessary components for your shed, they should include some (or all) of the following:
- Solar panels
- Fuse box
- Inverter
- Battery or batteries
- Proper wires/cables
- Mounting brackets
Shop Solar Kits has several of these off-grid systems available on its website. You can browse their complete kits here (affiliate link).
An example of one of their kits is pictured below. You can clearly see that this kit has several more parts than the Renogy kits.
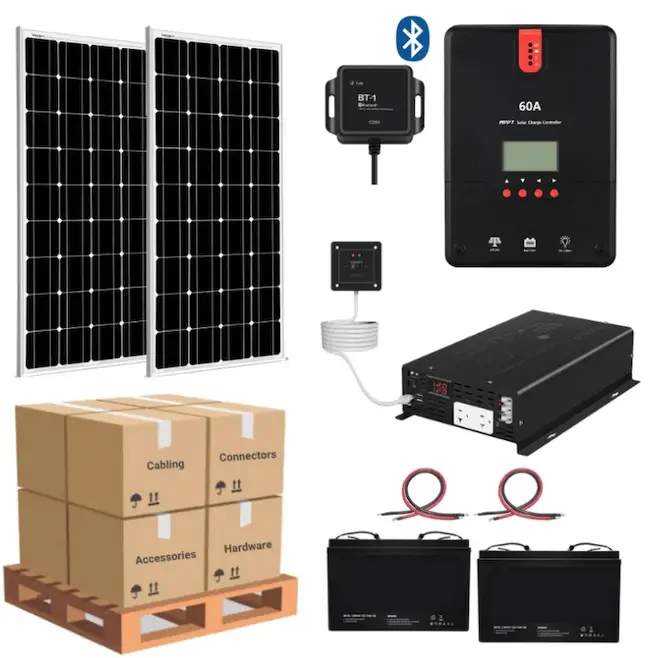
Here’s what this kit includes:
- 1 x 2,000W 12V Pure Sine Inverter – 120V Output
- 2 x 200 Watt Monocrystalline Solar Panels (12V)
- 2 x 12V Batteries – Choice of AGM or Lithium Batteries
- 1 x 60A MPPT Solar Charge Controller
- 1 x 10AWG Solar Extension Cables PV, approx. 50ft
- 1 x 4AWG Inverter Cable, approx. 3ft
- 1 x 4AWG Inverter Cable, approx. 1ft
- 1 x 4/0AWG Inverter Cable, approx. 3ft
- 1 x 4/0AWG Inverter Cable, approx. 1ft
- 1 x 4/0AWG Inverter Cable, approx. 2ft
- Fuse and Fuse Holders
- 1 x 15A inline fuse kit, MC4
- 2 x Solar Panel Z-Brackets
- Free System Schematic / Wiring Diagram
Similar: Titan Solar Generator Review – The Best Large Solar Generator?
How Many Watts of Solar Do You Need for a Shed?
A shed typically needs anywhere from 200-1,000 watts of solar panels to effectively charge a battery or batteries for consistent use. The amount of solar panels needed for a shed is dependent on average sunlight conditions as well as daily power consumption needs.
As you increase the solar panel wattage on your shed, you should also make sure that your charge controller is capable of handling the total output from the panels.
I wrote a post about this because it can be confusing to find the right one for your exact setup. The type of controller depends on the number of panels, total wattage, and configuration (series or parallel). I explain all of this in my post and give exact models of controllers you can use. Check out here: What Size Charge Controller Do I Need? (50-400W).
Is It Worth Putting Solar Panels on Your Shed?
It is worth putting solar panels on a shed because they provide free off-grid energy, are low-maintenance, and last for decades. In addition to solar panels, a complete system includes a battery, charge controller, fuse box, and inverter.
Solar installations are quite easy to take care of and require little maintenance.
Still, periodic cleaning of the surface of the solar panels will keep off dirt and dust, which might affect performance. This should be done once a month.
Bottom Line
The Renogy 200-watt 12-volt monocrystalline solar starter kit is a simple, powerful system making it a worthwhile investment of your money.
While it is not a big installation, it is great for off-grid power needs or a periodic substitute for high power bills.
If you want more power, you can install up to 400W of solar panels to your system.
Renogy also has several charge controllers sold separately as well as inside other kits if you’d like to expand your system.
If you’d rather build and install your own custom system instead of a kit like this, I recommend reading my DIY post that’s more “How to Install Off Grid Power for a Shed“. I go over more intricacies of what to look for and how to properly find and install your system.