Key Takeaways
- The article answers the core battery question directly and explains the specs that matter most in practice.
- Capacity, cycle life, chemistry, and depth of discharge shape performance and long-term value.
- Examples show how battery choices affect runtime, charging behavior, and off-grid reliability.
- The main takeaway is to match battery type and size to the application instead of shopping by price alone.
Solar panels vary in watts as well as volts. These variations affect which ones you can use to charge a typical 12V battery.
As a general rule, you need at least a 12V solar panel to charge a 12V battery. A 12V battery needs an input above 12V for it to charge. A 12V solar panel typically outputs 14-20V depending on the sunlight conditions.
Since the voltage of a 12V solar panel can be much higher than the battery’s voltage, it’s best practice to use a charge controller to regulate input voltage.
A solar panel needs to have a charge controller in most cases to charge a 12V battery.
I’ll explain charge controllers and solar panel options in more in-depth in the next section.
Before this, there are two main types of solar panels that you can choose from: monocrystalline and polycrystalline. One is the more refined version with slightly better cells but comes at a slightly higher cost.
You can read about the details between these two panels here: Monocrystalline Vs. Polycrystalline Solar Panels – What’s the Difference?
Ideal solar panels to charge 12V batteries

Solar panels rated at 12V or higher will charge a 12V battery. To protect your battery, using an MPPT charge controller as an intermediary between the battery and the solar panel will regulate the voltage coming into the battery while providing the most input power possible from the solar panel.
Using the correct solar panel with an MPPT charge controller will give you the best results for charging a 12V battery.
The solar panel will be able to output a higher number of volts than what the 12V battery can realistically handle, so the voltage needs to be regulated so the battery is protected.
One of the most common types of solar panels available is a 100W solar panel, so I’ll use this size as an example.
The Rich Solar 12V 100W Monocrystalline solar panel has a maximum power voltage of 18.6V and an open-circuit voltage of 22.8V. This means that in perfect conditions, the panel will output about 18.6V and sometimes 1-2 volts higher.
With this panel connected directly to the battery, it will have too many volts going into it, which can damage the battery. Using an MPPT charge controller, the voltage will be distributed correctly according to the battery’s charging limits.
If the panel is producing 20V, the controller will reduce that number to just above the voltage of the battery.
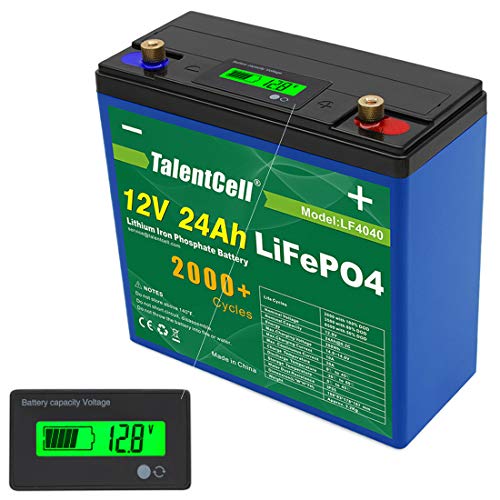
Using my TalentCell 12V 24Ah LiFePO4 battery as an example, its maximum charging voltage is between 14-14.6V.
This means that the charge controller will reduce the 20V from the solar panel to around 14-14.6V to charge the battery at a healthy rate.
So what happens to the extra volts taken from the MPPT? They get transferred into amps! The amperage increases while the voltage stays consistent with the battery’s voltage.
If the Rich Solar panel is bringing in 20V and is perfectly hitting 100W of total power, then its amperage is 5A (Amps x Volts = Watts).
If the MPPT is taking 14V from the 20V to charge the battery properly, then the amperage gets boosted to about 7.14A to keep that 100W of solar power going into the battery.
Since my battery example is rated at 12V 24Ah, this multiplies together to reach 288Wh of battery capacity.
With 100W of solar input coming into the battery, my battery will recharge in about 2.9 hours in perfect sunlight.
Clearly, my example is not realistic for most, but it shows the way the panel, charge controller, and battery work together.
Now, the size of your 12V battery as well as the size of the solar panel(s) will help determine how long it will take to charge the battery to full.
In addition, the weather conditions need to be considered, as they can significantly affect the output of the panel(s).
How big of a solar panel do I need to charge a 12V battery?
A 150W solar panel is needed to charge a 12V, 50Ah battery in five hours with good sunlight. A 100W solar panel will produce 33.33Ah at 12V in the same period and weather conditions.
Below I have some examples of power produced from different solar panel wattages after five hours of sunlight.
| Solar Panel Size (W) | Realistic Solar Output (80%) | Power Produced After 5 Hours (Wh) |
|---|---|---|
| 50W | 40W | 200Wh (16.67Ah @ 12V) |
| 100W | 80W | 400Wh (33.33Ah @ 12V) |
| 150W | 120W | 600Wh (50Ah @ 12V) |
| 200W | 160W | 800Wh (66.66Ah @ 12V) |
Another specification to look at on a solar panel is its voltage.
When using a panel rated from 12-18V (nominal) you can use either a PWM or MPPT charge controller to connect solar to the battery.
However, you can use 24V solar panels with MPPT charge controllers for charging a 12V battery. This is because an MPPT will lower the voltage from the panel while simultaneously increasing the amperage. This process charges a 12V battery at a faster rate than a typical 12V panel.
If considering doing this, make sure to choose the correct MPPT that is rated to handle the power you intend to use with the solar panel(s).
For a visual difference between PWM versus MPPT controllers, I found this video to be very helpful.
How long does it take to charge a 12V battery with a solar panel?

A 12V, 50Ah battery will recharge in five hours using 150W of solar panels at 80% efficiency (120W). This same battery will recharge in 3.75 hours with 200W of solar panels at 80% efficiency (160W).
| 12V Battery Size (Ah) | Solar Charge Time @ 120W | Solar Charge Time @ 160W |
|---|---|---|
| 50Ah | 5 hours | 3.75 hours |
| 75Ah | 7.5 hours | 5.63 hours |
| 100Ah | 10 hours | 7.5 hours |
I have an article with more information on measuring battery capacity that you can find here: What Is Battery Capacity & How Do I Measure It? (mAh/Wh/Ah/V).
How do you hook up a solar panel to a 12-volt battery?
Using a charge controller, secure the negative wire into the controller and then fasten the opposite negative end of the wire onto the negative/ground of the battery (colored black).
Repeat this process using the positive/red wire. Then, connect the negative/black wire from the solar panel to the charge controller and repeat for the positive/red wire.
This process allows you to safely connect all parts of the system.
For a visual representation of how to do this, follow this video from Will Prowse or continue below.
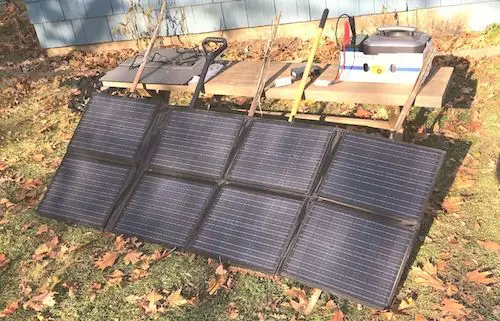
With my system, I used the Atem Power 200W solar panel with a TalentCell LiFePO4 battery. The solar panel came with an MPPT controller.
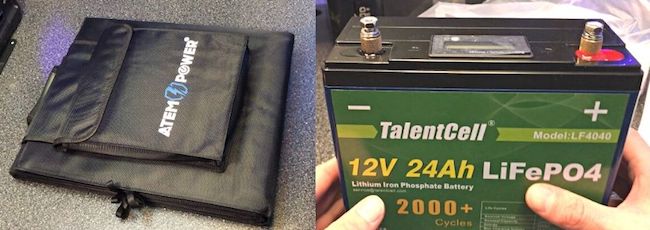
Using this outside, the Atem Power kit came with Anderson adapters to connect everything. These are large gray adapters that you’ll see below. I first connected the battery to the charge controller using alligator clips that came with the solar kit.
At this point, the battery light on the charge controller is on.
From there, I connected the solar panel to the charge controller with the other set of Anderson cables.
At this point, the solar panel light/icon appeared on the controller.
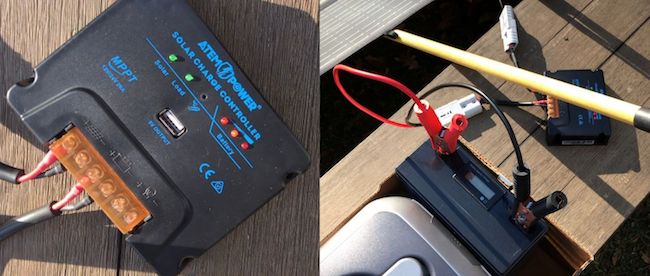
Using a kit like I did is an easier way to connect solar panels to a battery via a charge controller. The Anderson cables make it simple to connect everything.
Can you connect a solar panel directly to a 12V battery?
It is not recommended to connect a solar panel directly to a 12V battery. This is because the voltage of the solar panel could damage the battery due to either too high or too low of a voltage. If you’re using a small solar panel to trickle charge your battery, you can directly connect it to the battery as long as this panel doesn’t exceed 5W.
If you’re looking for a solar panel over 5W, it is best to use a charge controller. It will allow the panel and battery to work in unison.
Main elements needed for solar charging (Recap)
A solar battery charger requires three components to work correctly (this includes the solar panel).
1. Solar Panel:
A solar panel is a vital part of the solar charger. It is the part you put under direct sunlight to generate the energy stored in the battery pack.
When choosing your solar panel, you must exercise care to ensure that you select the appropriate panel for your needs.
There are three types of solar panels in stores – rigid, flexible, and foldable. A rigid panel generates more power than flexible ones and is also perfect for rough environments.
If you, however, want a lighter panel, you should select the flexible type.
For portability, choose a “foldable” or “portable” solar panel. Portable solar panels range from less than 10W up to 200W or more. You can find my review of a 120W foldable panel here: ELECAENTA 120W Foldable Solar Panel Review (Testing & Comparison).
When choosing a solar panel, also inspect its voltage rating. This will enable you to select the appropriate solar panel for your device.
For instance, to charge a 12-volt battery, you’ll need a solar panel that produces a minimum of 12 volts. If you want the battery to charge faster and perform better, then you should go for a solar panel that produces more power, such as 16 volts.
2. Battery:
The battery is the storage vessel inside which the solar panel’s energy generated from the sun is held.
The ideal battery type you can use to store solar energy is the deep cycle battery, as it can handle multiple recharge cycles.
It is also difficult to damage this battery after frequent charging situations because of its internal plate and electrolyte.
3. Charger Controller:
This component of a solar battery charger is a very important part of the solar charger as it improves performance.
It also enhances the device’s protection during charging cycles. Additionally, it disconnects the battery automatically when the cells are fully charged.
Your solar battery charger must have a controller as it provides you with peace of mind during charging.
The next section includes an inverter in the solar setup. This allows the battery to be used with AC-powered devices.
Although the process of solar charging a battery comes with multiple steps, there are several additional guides available to make it easier to understand what works for you.
If you’d like the easiest possible way to have portable power on hand, I recommend checking out my article comparing solar generators to using solar panels and batteries (DIY method): Solar Generator vs Solar Panels (With Battery).