A solar generator is easiest to use when you treat it as a battery system with strict input and output limits. Read the exact manual, inspect the unit and cables, verify the charging source, charge the battery, compare your appliance’s running and startup watts with the inverter limits, connect the load, and monitor temperature, ventilation, state of charge, and remaining runtime.
Key Takeaways
- A “solar generator” normally combines a portable power station with compatible solar panels; the station stores and converts energy while the panels recharge it.
- Check voltage, current, wattage, connector, and polarity before connecting any third-party panel or array.
- Battery capacity in watt-hours (Wh) estimates how long a load may run; inverter output in watts (W) limits what can run at one time.
- Storage charge, pass-through use, temperature limits, and maintenance vary by model. The exact manufacturer manual controls.
- My firsthand examples below use older equipment, but the compatibility checks and setup lessons still apply.
What Is a Solar Generator?
A solar generator has two main parts: a portable power station and one or more solar panels. The power station contains the battery, battery management system (BMS), inverter, and charge controller. Solar panels provide DC input; the station stores that energy and supplies devices through AC, USB, and DC output ports.
The inverter converts battery DC power to household-style AC power. The BMS monitors and protects the battery. The internal charge controller regulates supported charging input. These components are built around model-specific limits, so similar-looking stations can behave very differently.
How to Use a Solar Generator in Seven Steps
1. Read the exact manual
Find the manual for your exact model and region. Check charging methods, input voltage and current limits, output ratings, operating temperature, storage guidance, ventilation clearances, pass-through or UPS/EPS behavior, and any medical-device restrictions.
2. Inspect the station, cables, and connectors
Do not use a unit or cable that is cracked, swollen, frayed, wet, unusually hot, or producing an odor. Confirm that connectors are clean and undamaged. Place the power station on a stable surface with open vents.
3. Confirm the charging source
For wall or vehicle charging, use a compatible cable and source. For solar, verify the array’s open-circuit voltage, current, wattage, connector, and polarity before connecting it. Cold temperatures can raise a panel’s open-circuit voltage, so leave adequate margin below the station’s maximum.
4. Charge the battery
Connect the approved charging source and watch the display for input watts, temperature warnings, and estimated time. A new unit may arrive partly charged—or even at 0%, as my Goal Zero Sherpa 100AC did. Follow the manual’s first-use instructions instead of assuming every lithium battery needs the same initial charge.
5. Compare the load with the output limits
Check each device’s running watts and startup demand. Add simultaneous loads and stay within the station’s continuous output rating. Surge, peak, Power Lifting, and X-Boost are not interchangeable terms; branded boost modes may alter voltage and are not equivalent to full continuous output.
6. Connect the load to the correct port
Use USB or regulated DC outputs when they fit the device, because avoiding the AC inverter can reduce conversion loss. Turn on AC output only when you need it. Never backfeed a household receptacle. Connecting a station to home wiring requires an appropriate listed transfer device installed according to applicable codes.
7. Monitor the system
Watch output watts, remaining energy or runtime, temperature, fan behavior, and state of charge. Keep the unit dry and ventilated. Stop using it if you see damage, swelling, persistent errors, excessive heat, smoke, or unusual odor.
Safety Checklist Before You Start
- Keep the power station and ports dry unless the exact enclosure rating and manual explicitly allow the conditions.
- Do not cover cooling vents or place the unit near heat, flame, corrosive gas, or combustible material.
- Use compatible cables and connectors with correct polarity.
- Do not exceed input voltage, current, or wattage limits.
- Do not exceed continuous output or ignore motor/compressor startup demand.
- Do not operate a fuel-burning generator indoors or in an enclosed space.
- Never backfeed a wall outlet or improvise a connection to household wiring.
- Confirm any medical device’s external-power requirements with its manufacturer.
Understand Watts, Watt-Hours, and Startup Surge
Watts (W) describe power at a moment in time. Watt-hours (Wh) describe stored energy. A 1,000Wh station does not necessarily run a 1,000W appliance for exactly one hour because the inverter, wiring, electronics, temperature, and battery limits consume some energy.
Continuous inverter rating is the amount of AC power the station can supply steadily. Surge or peak rating is a short-duration allowance for starting certain loads. Refrigerators, pumps, air conditioners, and power tools can draw much more during startup than their normal running watts.
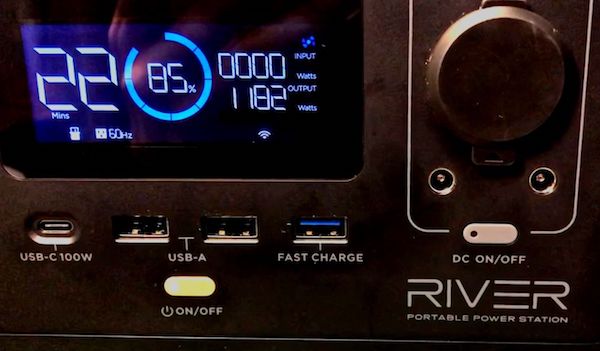
In my EcoFlow RIVER Max example, the display briefly showed 1,182W while I used a hair dryer. That is a useful firsthand observation of what the display reported during that setup; it is not a laboratory efficiency measurement or proof of sustained output at 1,182W. Always use the exact model’s manual and appliance behavior when judging compatibility. Learn more about pure versus modified sine-wave inverters when matching sensitive AC devices.
How to Estimate Runtime
Use a transparent estimate instead of copying a fixed manufacturer runtime without its assumptions:
Estimated AC runtime ≈ usable battery Wh × inverter efficiency ÷ average load W
If a 1,000Wh station provides 850Wh of usable AC energy and the average load is 100W, the estimate is about 8.5 hours. A refrigerator is more complicated because it cycles on and off, while a heater may draw nearly its rated wattage continuously. Temperature, ECO settings, battery age, idle draw, startup demand, and load variation can change the result.
Use the portable power station runtime calculator to model your own device. Label manufacturer runtime examples as estimates, and do not present them as my test results unless I actually measured them.
What Can You Power?
A solar generator can run devices that fit both its energy capacity and output limits. Small stations work well for phones, laptops, cameras, lights, routers, and fans. Larger systems may run refrigerators, cooking devices, pumps, tools, or air conditioners, but only when continuous output, startup surge, battery capacity, and thermal limits all fit.
Prioritize essential loads during an outage. Turn off unused AC output, avoid running several high-draw devices together, and account for intermittent loads. For medical equipment, verify compatibility and backup requirements with the device manufacturer; do not assume a consumer power station is a medical-grade UPS.
The older models previously listed here—including the EcoFlow RIVER Max, Jackery Explorer 1000, BLUETTI AC200MAX, and Goal Zero Yeti 6000X—remain useful historical examples of different size classes, but their old fixed runtime figures should not be treated as current PPS measurements or current buying recommendations.
How to Charge a Solar Generator
AC wall charging
Use the manufacturer-supplied or approved AC cable and a properly grounded outlet. Some stations charge from a simple cable, while others require an external adapter. Charging speed, temperature limits, and whether fast charging can be reduced in an app all vary by model.
Vehicle charging
Use the compatible vehicle cable and follow the station and vehicle instructions. Many manuals advise starting the vehicle before charging so the station does not drain the starter battery. Vehicle input may be slower than wall charging.
Solar charging
Solar is the most compatibility-sensitive method. Confirm all of the following before connecting a panel or array:
- Maximum open-circuit voltage (Voc)
- Accepted voltage range
- Maximum input current
- Maximum solar wattage
- Connector type and polarity
- Series or parallel configuration
- Cold-weather Voc for the planned array
A panel can have more nameplate watts than a station accepts, but voltage must never exceed the station’s limit. Current behavior and overpaneling rules vary by controller and manufacturer. When in doubt, use the manufacturer’s recommended panel or have the full array checked by a qualified person. The solar panel sizing guide for power stations explains these checks in more detail.
Firsthand Solar Hookup Examples
The following examples document setups I personally used. The equipment is older, so treat the photos and adapter lessons as firsthand examples—not current product recommendations.
Example 1: Direct connection
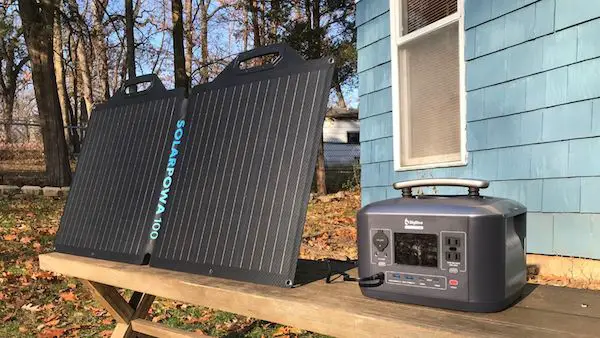
My BigBlue Cellpowa500 power station connected directly to the matching Solarpowa100 panel. This was the simplest setup because the products were designed to work together. Even with a same-brand kit, I still recommend checking the manual and input label before the first connection.
Example 2: One adapter for a third-party panel
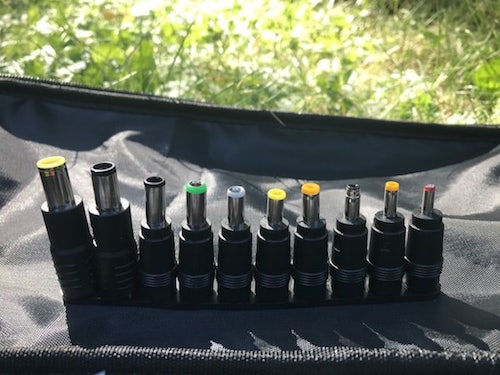
I connected my Elecaenta 120W panel to a Jackery Explorer 300 with the compatible 8mm adapter supplied with the panel. The physical fit alone did not establish electrical compatibility; the panel and station limits also had to match.
Example 3: Multiple adapters and two panels
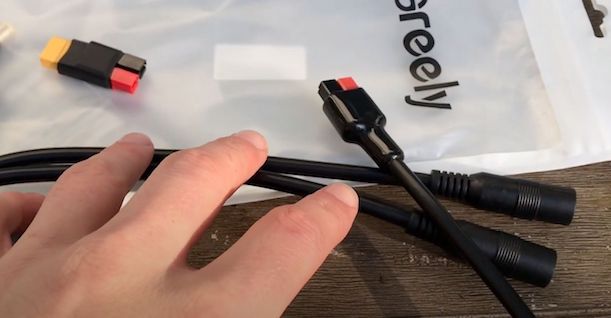
I used two Elecaenta panels, a dual-8mm-to-Anderson adapter, and an Anderson-to-XT60 adapter with my EcoFlow RIVER Max. This shows why adapters need careful review. Before recreating any multi-panel setup, verify the array configuration, combined voltage and current, polarity, connector ratings, and the exact station manual. Do not copy an old wiring example only because the plugs appear to fit.
Do You Need a Charge Controller?
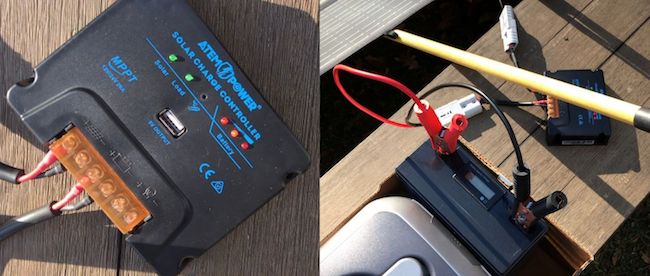
Commercial portable power stations normally include an internal solar charge controller, so you should not add a second external controller unless the manufacturer specifically requires it. Connect only panels or arrays that meet the station’s documented input limits.
A DIY battery system is different. It needs purpose-built charge control, overcurrent protection, disconnects, correctly sized conductors, and battery-specific settings. I do not recommend a “very low charging rate” as a general exception. Use the charge controller sizing guide for background, then have a qualified person review any DIY design.
Can You Use a Solar Generator While It Is Charging?
Sometimes, but this is model-specific. A station may support pass-through charging, AC bypass, EPS, or UPS behavior under defined inputs and loads. These terms are not interchangeable, and some modes disable boost features or impose different output limits.
Follow the exact manual for supported charging sources, maximum load, transfer time, temperature, and battery behavior. Do not assume that using a station while charging always harms cycle life, or that every input method works the same way.
Can You Use a Solar Generator Indoors?
The battery power station can generally be used indoors when the manufacturer permits it, the unit is dry and undamaged, and its vents remain clear. Solar panels can remain outdoors while a compatible cable carries power to the station.
A fuel-burning generator must never operate indoors, in a garage, or in another enclosed space because of carbon monoxide. Keep the power station itself away from water, excessive heat, flammable material, blocked ventilation, and unsafe household-wiring connections.
Battery Care and Storage
There is no universal best storage percentage for every portable power station. Chemistry, BMS design, firmware, temperature, and manufacturer instructions differ. Follow the exact manual for storage state of charge, inspection interval, temperature, and recharge schedule.
Personal note: I have often stored my own power stations around 65–80% and checked them every two to three months. That is my routine, not a universal rule. If a current manual gives a different range or maintenance cycle, follow the manual.
Inspect stored equipment periodically for swelling, damage, corrosion, or unusual odor. Keep it in a cool, dry, ventilated location, and do not leave a lithium battery deeply discharged for a long period. The solar generator maintenance checklist provides a practical review routine.
What to Look for When Choosing a Solar Generator
Use a specification checklist instead of relying on one headline wattage:
- Battery capacity in Wh and expected usable energy
- Continuous AC output, surge behavior, and waveform
- Solar voltage, current, wattage, connector, and polarity limits
- Wall, vehicle, and solar charging time
- Battery chemistry and manufacturer cycle-life conditions
- USB-C, USB-A, regulated DC, and AC port requirements
- Expansion-battery support, if needed
- App control and low-load timeout behavior
- Weight, ventilation, environmental limits, and warranty
- Documented pass-through, EPS, or UPS behavior
- Evidence of firsthand testing versus specifications-based research
For current products, compare the latest best solar generators. See our testing and research methodology for how firsthand observations, published specifications, and recommendations are separated.
Below are some additional important features to look for when researching solar generator models and kits, along with resources for more information on each:
| Solar Generator Specs & Features | Importance | Suggestions | Resources |
|---|---|---|---|
| High battery cycle life | The higher the cycle life, the longer the battery lasts | If possible, choose a portable power station with a LiFePO4 battery | How Long Does a Solar Generator Last? |
| Replaceable batteries | You won’t have to buy an entirely new power station when the battery cycle life is used up | Find a system that has replaceable batteries, a long cycle life, or both to reduce costs over time | 4 Solar Generators With Replaceable Batteries |
| Battery capacity | More battery capacity translates to longer running times for devices and appliances | Have an idea of what you want to power with your solar generator to estimate how much battery capacity you need | “How Big Should My Solar Generator Be?” (Bluetti) |
| Input power/recharging times | Fast recharging times means less time waiting for power; however, charging up too fast and too often can reduce battery cycle life | If you intend to use a solar generator often, find one that can be fully recharged in about a day (5-7 hrs) from solar panels | How Long Does It Take to Charge a Solar Generator? |
| AC output power | A high AC output can power appliances with greater energy demands | Calculate energy consumption – add up the wattage of appliances you intend to use with your solar generator | Top 3 Most Powerful Solar Generators |
| Regulated DC ports | Allows consistent charging voltage to sensitive devices (like your phone) | Check to see if the DC ports are listed as regulated when researching power stations | “Lithium Solar Generators: Why you need a regulated 12v output” (Will Prowse) |
| WiFi-capable | You can control the generator from your phone (ideal for home use) | Choose a power station with this feature if you’re leaving it in one place and if turning on/off ports remotely will benefit you | Yeti App (Goal Zero) Bluetti App (Bluetti) EcoFlow App (EcoFlow) |
| Input ports | If you use a third-party solar panel with your power station, you may need an adapter to pair them together | Either use the recommended solar panels from the same company as the power station or purchase an adapter if using third-party panels | How I set up my EcoFlow River with 3rd party panels |
| Pass-through charging | If you’re using a solar generator on a daily basis, this feature can keep power easily accessible; however, it can reduce overall battery cycle life | Check to see if the power station allows for pass-through charging – If it can, review best practices (if provided) | DIY Solar Forum |
Final Checklist
Before using your solar generator:
- Read the exact manual and verify the model/region.
- Inspect the station and every cable.
- Confirm charging-source limits and connector polarity.
- Charge within the allowed temperature range.
- Check appliance running watts and startup demand.
- Use the correct output port and keep vents clear.
- Monitor load, heat, state of charge, and runtime.
- Stop immediately if the unit is damaged, wet, swollen, unusually hot, smoking, or producing an odor.
FAQs
Can I plug a solar panel directly into a portable power station?
Yes, when the panel or array stays within the station’s voltage, current, and wattage limits and uses the correct connector and polarity. Some setups need a compatible adapter. Never assume a matching plug proves electrical compatibility.
Should I fully charge a new solar generator before using it?
Follow the exact manual. A new unit may arrive at any state of charge, and first-use instructions vary. You do not need one universal percentage for every lithium power station.
What is the safest way to connect a solar generator to a house?
Do not plug the station into a wall receptacle to backfeed the home. Use only a manufacturer-supported home-backup connection or an appropriate listed transfer device installed according to applicable codes, typically by a qualified electrician.
How do I know whether an appliance will run?
Compare the appliance’s continuous and startup demand with the station’s AC output limits, then estimate whether the battery has enough usable Wh for the required time. Check compressor, pump, and motor startup carefully.
Do I need an external charge controller?
Not for most commercial portable power stations, because the controller is built in. A DIY battery system needs correctly designed charge control and protection.