Key Takeaways
- The article answers the core solar generator question directly and explains the main variables that affect the result.
- Capacity, inverter output, charging speed, and appliance startup loads are key to making the right decision.
- Examples help readers apply the advice to backup power, camping, RV use, or off-grid scenarios.
- The main takeaway is to size the system for real energy needs instead of relying on headline wattage alone.
In this thorough guide, I’ll be showing you the ins and outs of solar generators so that you can find the best setup for your off-grid power needs.
I’ll begin with the fundamentals and then work into the specifics of both retail solar generators (Jackery, Bluetti, etc.) and DIY solar generators.
Table of Contents:
- What Exactly Is a Solar Generator?
- How Do Solar Generators Work?
- What Is a Solar Generator Used For?
- Solar Generator Types and Sizes
- What Type of Solar Panels Do You Need?
- What to Look For in a Solar Generator
- Solar Generators vs Gas Generators
- DIY Solar Generators: Step-By-Step Guide
- Limitations of Solar Generators
What Exactly Is a Solar Generator?

A solar generator is essentially a compact electronic box that consists of three main components:
- A Charge Controller
- Batteries
- An Inverter
Solar energy is collected through solar panels, regulated by the charge controller, and is then stored in a high-capacity battery.
The inverter then converts the battery’s stored DC energy into AC power for use with a wide variety of appliances and devices.
Solar generators that are more advanced may have a circuit breaker, which stops the connected devices from taking up too much electricity.
How Do Solar Generators Work?
A solar generator works by integrating solar panels, a charge controller, a battery, and an inverter into a compact system to convert solar energy into usable power. Charge controllers allow solar panels to safely charge the battery while inverters produce AC power for your appliances.
My video below will hopefully give you some additional understanding of how these components work cohesively.
The average voltage rankings for solar generator batteries are 12 and 24 volts, with some even being configured at 48 volts.
To better understand how solar generators work, we will discuss each of the components and their functions individually.
Solar Generator Component #1 – The Battery
A solar generator needs to store the energy it collects from the sun for later use. The battery functions as a storage unit.
Lithium-ion batteries are most commonly found in solar generators today, but you can also use lead-acid batteries, which are less expensive upfront.
However, lithium-ion batteries have more advantages than lead-acid batteries and are more affordable in the long term.
If you want to see the details of these advantages, check out my comparison of the two battery types here: Lead-Acid vs Lithium Batteries – Which To Use?
Solar Generator Component #2 – The Charge Controller
The charge controller is a vital component of a solar-powered generator. Its main purpose is to protect and promote the longevity of the battery. It does this by acting as an intermediary between the solar panel and the battery.
As solar energy passes through the controller, the controller regulates the incoming power according to the battery’s charging status. This promotes a smooth and efficient charge.
Charge controllers usually have differing features for charging and discharging based on the type of battery that you are using. For example, a lead-acid battery charges differently than a lithium-ion one, so you can usually program the charge controller to adapt to whichever battery you’re using.
However, off-the-shelf solar generators like a Bluetti Elite 30 V2 model don’t need this feature because it has a preinstalled lithium-ion battery that cannot be replaced.
Solar Generator Component #3 – The Inverter
The inverter converts the low DC current from the battery to AC power that can be used to power appliances and devices in your home.
The inverter is not needed for USB and 12V output ports since they are already running on DC power.
The inverter steps up the battery voltage rating from 48, 24, or 12 volts to the appliance voltage rating of 110 volts (and, in some cases, 240 volts).
An inverter generates heat when in use, so it has its own cooling fans to keep it running effectively. These fans are typically the only moving components in a solar generator.
More information on inverters can be explored below:
- Can You Use a Solar Panel Without an Inverter?
- Is It Okay to Use a Modified Sine Wave Inverter?
- What is a Solar Inverter and How Does it Work?
What Is a Solar Generator Used For?
Here’s a breakdown of who should invest in a solar generator as well as the cases where they are most beneficial:
1. Home / Apartment
Show more
- Solar generators are invaluable assets for home and apartment owners. Natural disasters, storms, unexpected power outages, and transformer malfunctions may happen at any given time, making your family vulnerable. When these emergencies happen, a solar generator can provide off-grid energy where needed until power is restored.
- Below are some of my top picks for both apartments and homes:
2. Camping / Day Trips
Show more

- Solar generators can offer campers lots of comfort when they are out to satisfy their quest for adventure in the outdoors.
- You can use the solar generator to power many tools, including tablets, laptops, electric lamps, electric cooking stoves, digital cameras, phones, portable fridges, e-bikes, and portable fans, making your camping experience more comfortable if desired.
- There are several portable power stations that can be used effectively while camping. For lightweight models, I’d look into ones with 300Wh batteries or smaller ones.
- However, if you’re looking for a solar generator to power your CPAP while camping, I’d look into models with at least 500Wh of battery capacity.
3. RV, Trailer, & Van Life
Show more>
Solar generators are ideal for a weekend warrior or a boondocking full-timer because:
- You can choose a larger system if you need more power for longer periods
- You can install multiple solar panels on your vehicle’s rooftop for faster charging
For more information on RV solar, check out my post here: What Kind of Solar Panel Do You Need for Your RV? (Basic Guide).
4. Boating / Fishing
Show more
Solar generators are increasingly gaining popularity in the marine industry. Using a portable solar generator on your boat or when fishing can open up numerous possibilities. You may be able to power your phone, a compact refrigerator, an air conditioner, a coffee maker, or even a microwave depending on what’s necessary for your activity. However, most portable power stations aren’t waterproof or water-resistant, so it would be best to have some form of cover so it doesn’t get wet.
Solar Generator Types – Small to Large
There are many different styles of solar generators available, each offering its own unique attributes.
It’s important to consider how you plan to use your power station. If you’re only looking to recharge devices, then a smaller model is probably the best option. If you’re using it to power heavy-duty appliances, then getting a large power station with a powerful inverter is a good idea.
Lastly, it’d be best to determine if you plan to use it as a backup solution in case of an emergency at home, or if you plan to use it as a portable option for generating power during outdoor activities such as camping or fishing.
Below I break down the three main types of solar generators with different power levels.
Small Portable Solar Generators
- Approx. Battery Capacity Range: 200-600Wh
- Est. AC Output: 200-600W continuous (400-1,200W surge)
- Recharging Input (Max) Range: 60-200W
- Typical Uses: Recharging devices; powering small AC and DC appliances
- Price Range: $200-500
A small portable solar generator may be ideal if you plan to use it while you are on the go. With smaller batteries, this helps to reduce their overall weight, making them easy to pack and carry.
Some examples include the following models (each one is linked to my individual review):
- Yeti 200X
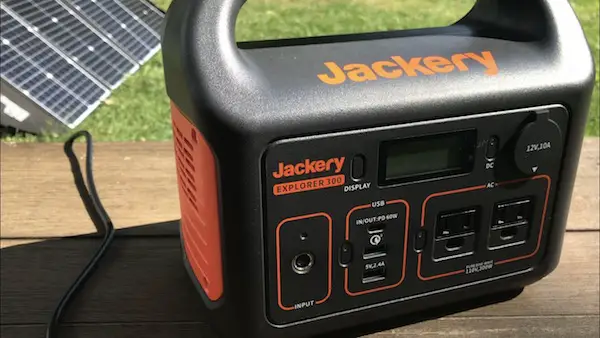
- Jackery Explorer 300
- Suaoki G500
- Rockpals Rockpower 500
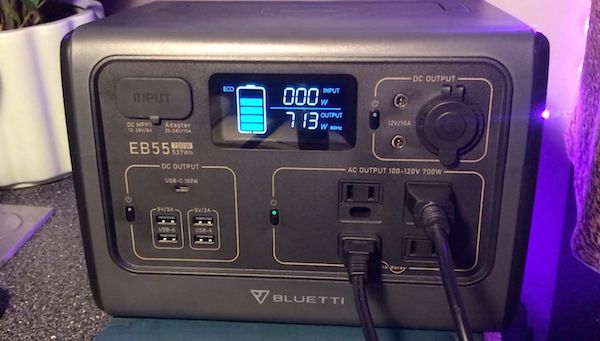
- Bluetti EB55
- EcoFlow River Max
- OUPES 600W
Mid-Sized Power Stations

- Approx. Battery Capacity Range: 600-1,500Wh
- Est. AC Output: 600-2,000W continuous (1,200-4,000W surge)
- Recharging Input (Max) Range: 200-800W
- Typical Uses: Short-term power outage backup, recharging several devices at once, powering most common home appliances
- Price Range: $500-2,000
These types of power stations are usually ideal for families that experience short-term power outages from time to time and need something with a higher output and battery life to keep some electronics and appliances running.
Obviously, there are several different environments where this type of generator can be used, but the main point of this class is its versatility – More power, more battery life, yet small enough to be carried by 1-2 people.
The following are some examples of this style of solar generator:
If you’re looking for something in between a small and mid-sized system, I recommend reading my review of the Jackery Explorer 1000. It’s one of the lightest models in its class, at 22 lbs. You can check it out here: Jackery Explorer 1000 Power Station Review – Complete Value Analysis.
Solar Backup Generators (Heavy Duty)
- Approx. Battery Capacity Range: 1,500-4,000+Wh
- Est. AC Output: 2,000-3,600W continuous (4,000-7,200W surge)
- Recharging Input (Max) Range: 800-2,400+W
- Typical Uses: Partial backup of home appliances, peak load shifting, off-grid living (cabin, RV, etc.)
- Price Range: $2,000-6,000+
Solar backup generators are commonly used at home. They’re used in case there’s a need for a secondary power source if the power goes out.
They typically have a much higher AC output compared to portable solar generators. Some versions also can be paired with optional expansion batteries to store more solar power.
I was lucky enough to get sent one of these large systems in partnership with Nature’s Generator and their PowerHouse generator. It uses a lead-acid battery and weighs over 400 pounds! Check out my experience with the PowerHouse here.
Solar backup generators have a profound ability to power the most essential electrical appliances in the home. However, it’s important to note that you likely won’t find one that powers everything in your home.
Examples of these large solar backup generators can be found in these round-up posts here:
- Top 3 Most Powerful Solar Generators (Overview + Analysis)
- 5 Best Solar Generators for Cabins (Plus Example Scenario)
- 3 Best Solar Generators for Air Conditioners (Examples + FAQs)
What Type of Solar Panels Do You Need?
Another essential feature that you ought to look at in your selection is the type of solar panel that the solar generator has.
Nearly every brand that makes portable power stations (Jackery, Goal Zero, Bluetti, etc.) has an accompanying solar panel product line as an optional addition.
However, most of these panels offered are portable/foldable panels, which may or may not be what you’re looking for.
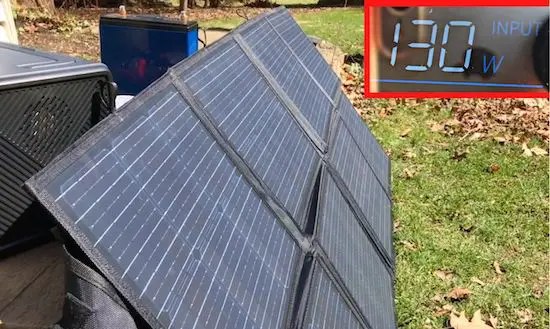
There are several rigid solar panels that are meant for mounting on rooftops, too. These are similar to the typical ones you may find on someone’s rooftop, like the one below.
Rigid Solar Panels
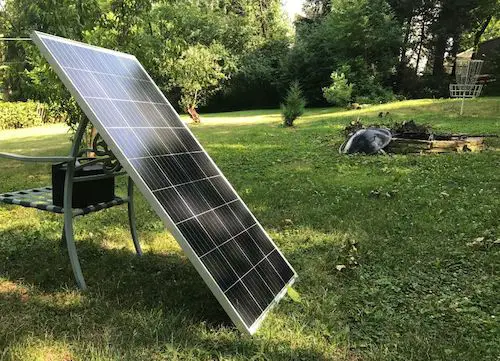
These panels are specifically meant for mounting on home rooftops, RVs, sheds, etc. They are typically heavier than foldable solar panels but they’re also sturdier. This is with good reason, too, because they’re intended to be outside year-round.
With this in mind, rigid panels also tend to have long warranties. In several cases, the warranty period can be anywhere from 10-25 years!
If you don’t intend to mount solar panels on your roof, then portable solar panels are going to be of interest to you.
Portable/Foldable Solar Panels
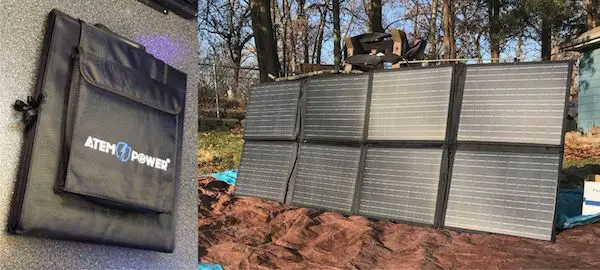
Portable panels give you the ability to charge your solar generator when you need to and then pack it up for storage when you’re on the go.
These are often used for camping needs or for short-term use if there’s a power outage and you need to charge your batteries up.
If you’re not going to use your solar generator system daily, then using this style of panel is ideal. I personally have two portable solar panels that I’ve used for years and they’ve been fantastic. Read my Elecaenta 120W solar panel review for more details.
I have some resources that you can navigate regarding this style below:
- Top 3 Best Portable Solar Panels for Off-Grid Use
- Portable Solar Panels: Advantages and Disadvantages
- What Size Portable Solar Panel Do You Need? (Detailed Overview)
Also, below is a video I made going over solar panel wiring which is a crucial step to get right when connecting multiple solar panels to your power station:
What to Look For in a Solar Generator
Although everyone has their own tastes on what they’d want out of a solar generator, the majority of the ideas I have listed below are the basics that everyone should look into.
After you have a good grasp of what to look for in terms of fundamentals, then any additional features are a bonus.
1. Battery Capacity
Proper battery storage is what makes it possible to use your solar generator for extended periods of time.
There are portable solar generators that come with battery capacities as small as 150Wh. This is essentially the same battery capacity as three large power banks combined.
For example, I used to own a Yeti 200X power station that had a 187Wh battery. It only weighed about five pounds, so it was a nice little system that I could use on the go.
At 150Wh, you would be able to charge multiple different devices pretty easily, but charging larger items like a laptop with it may take a large chunk of the battery to fully recharge it.
Be sure to select a solar generator with a battery capacity high enough to suit all your needs.
For example, if you need to power appliances such as refrigerators or small air conditioners, a solar generator with a 2,000Wh or higher battery capacity would do.
I have articles that go into detail on the ideal models for both AC units and refrigerators below if you’re interested:
- 3 Best Solar Generators for Your Fridge (With Run Times)
- 3 Best Solar Generators for Air Conditioners (Examples + FAQs)
2. Portability/Maneuverability
You don’t want to be lugging a giant battery around with you if you can have a lighter, more compact one that suits your needs.
A solar generator that weighs 10-20 pounds is ideal if you need a good amount of power on the go. At this weight, you’ll probably be able to find one with a battery between about 400-800Wh.
If you’re looking for a large solar generator, you may want to consider getting one with wheels for more comfortable transportation. Or you can invest in a cart with wheels and a handle to tow it around.
3. Inverter Rating
The inverter rating tells you the number of watts that you can draw from the generator’s AC outputs at any particular point in time.
There are two numbers in an inverter rating:
- Continuous output – The maximum allowable wattage that the inverter can maintain over time.
- Surge/Peak output – The highest wattage that the generator can reach for a very short period of time. This is mainly for when you start your appliances up, as several of them need a short burst of power before returning to their normal operating wattage.
Most solar generators have a surge rating that’s twice as much as the continuous power rating, so be sure to confirm the specifications.
4. Solar PV Input
A high solar input is crucial to have so that you can recharge your system as fast as needed. To figure out how fast a solar generator can recharge from solar panels, you will need to know the:
- Maximum solar input wattage (sometimes called PV input)
- Battery capacity (in watt-hours or Wh)
Sometimes the solar input listed is only in amps (A) and volts (V), simply multiply these two numbers together to get the maximum wattage.
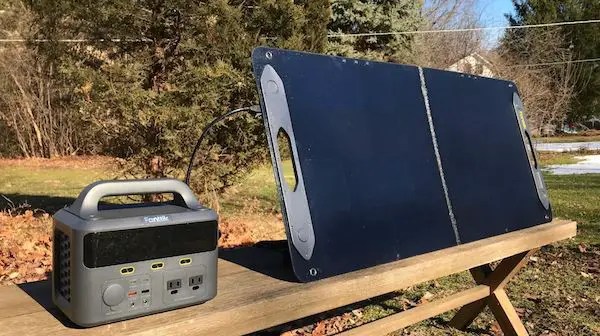
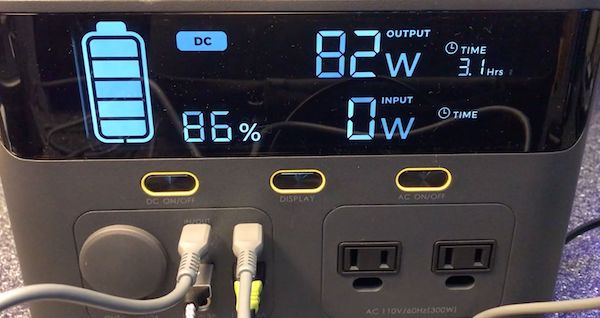
For example, my EcoFlow River Max has a 576Wh battery with a 200W max solar input. I can simply divide the 576Wh by 200W to get 2.88 hours. This number simply shows the estimated charging time (from 0-100% battery life) via solar panels if a constant 200W was maintained.
Overall, in about 3-3.5 hours (to account for the charge controller settings and varying sunlight conditions) the River Max will be fully recharged.
This is a great recharging time for this model.
I recommend reviewing the spec sheets for any model you’re interested in so you can find out its recharging speed from solar. Doing this can help you avoid getting one that charges too slowly.
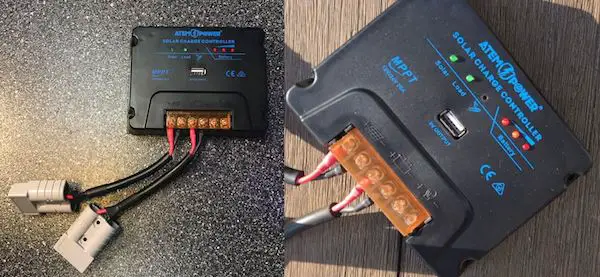
Lastly, it’s important to note the voltage and amperage limits for solar charging your generator. These should be listed on the generator, like below:
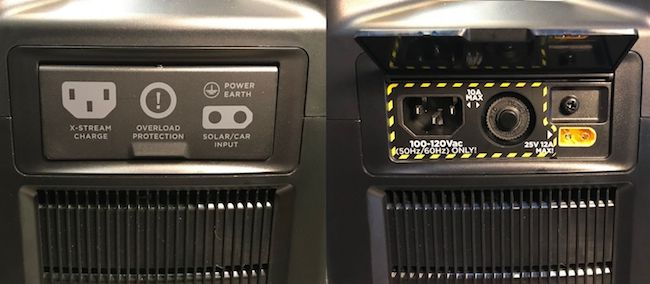
With these numbers in mind, you can get a solar panel that fits within these limits.
Below are some additional resources to help you size your system.
- How to Choose a Solar Panel for Camping (With Examples)
- What Kind of Solar Panel Do You Need for Your RV? (Basic Guide)
- What Size Portable Solar Panel Do You Need? (Detailed Overview)
5. Power Output Options
As you shop for a solar generator, another critical factor to pay close attention to would be the connectivity options. How many gadgets, electronics, and appliances can it accommodate?
Most solar generators have several USB, AC, and DC outlets. But some might have unique options like 30A RV ports, wireless charging pads, and Anderson Powerpole outputs.
6. Battery Cycle Life
Cycle life, or charge cycles, are extremely important to know when researching solar generator options. This rating tells you the number of times the battery can be fully discharged and recharged before it starts to lose its capacity (aka the ability to hold a charge).
For example, the Yeti 3000X has a cycle life of 500 cycles before its battery reaches 80% of its original capacity. Its original battery capacity is just over 3,000Wh.
After completely charging and then completely discharging its battery 500 times, the Yeti 3000X will now only be able to hold about 2,500Wh of battery juice compared to its original 3,000Wh.
The best solar generators take battery cycle life seriously because the higher the cycle life, the longer it will last. This saves you money in the long run.
The longest-lasting solar generators use LiFePO4 batteries. I’ll link my main article on this topic here: 6 Best LiFePO4 Solar Generators (Stats, Pricing, and Analysis).
7. Extra Features

Additional advanced features worth researching include WiFi integration, fast-charging USB ports, and advanced LCD displays.
Some solar generators come with advanced LCD displays that show you more details than others. For example, the Bluetti AC200P and EP500 models both have touchscreens to navigate several data points.
Thanks to advanced technology, you can also find models with WiFi connectivity. Connecting your generator to WiFi makes it easier for you to monitor power consumption and PV input. This is because you can use your smartphone to review data and interact with your system.
There are also solar generators that have fast-charging USB outlets. This charges your gadgets in a shorter time, especially if you are in a hurry to charge or power several devices.
Solar Generators vs Gas Generators
From the look of things, it seems that solar-powered generators are becoming serious contenders to gas generators.
More manufacturers are developing innovative solar generators that can challenge the dominance of gas generators.
Of course, fuel-powered generators have been in use for many years. They offer a good solution to power appliances and tools for emergencies and recreational activities.
However, a solar-based generator is proving to be a new replacement to fuel generators for various reasons which we will get into next.
Why Invest in a Solar Generator Over Gas Generators?
While gas generators emit fumes and need consistent refueling, solar power production completely depends on the capacity of the solar panel and the availability of sunlight.
Both generator styles have their own weaknesses, but opting for a solar generator brings some solid advantages:
1. Solar Generators Are Easier to Maintain: With nearly zero moving parts within a solar generator system, there is less need for maintenance as opposed to a gas generator, which has several moving parts. Combustion in a gas-powered generator is essentially a series of small and controlled explosions within its engine. In order to keep this process running long-term, they need to be lubricated correctly and consistently for smooth functioning.
2. Low Noise Pollution: The cooling fans within a solar generator are the only parts that create noise.
3. You Can Use Solar Generators Indoors: This is due to both low noise pollution and zero fumes emitted. With this ability, you can use a mid-sized or large system for offsetting utility costs in addition to backup power.
4. You Can Customize Your System: Portable power stations come in several different sizes, from the Jackery Explorer 300 which can fit in a backpack, to the Point Zero Energy Titan, which can connect several 2,000Wh batteries to its mainframe for long-lasting backup power. With larger solar generators, there are usually several variations and add-ons that you can use for your dwelling. If you decide to create your own DIY solar generator, you can pick out each component according to your own power requirements.
5. Longer-Lasting Off-Grid Energy: Probably the most important feature of all is solar charging. You only need sunlight in order to charge a solar generator off the grid. Plus, the right setup can keep your power running for much longer off the grid than a standard gas generator can.
Similar: Gas vs Solar Generators – Which Makes More Sense?
DIY Solar Generators: Benefits of Building Your Own System
A solar generator is a valuable investment whether you live in an area where electricity is available or not.
With a solar generator, you’re guaranteed reduced electricity costs, and you always have a way to power your home with ease. Not to mention, solar generators offer more benefits compared to their conventional counterparts.
The best part is that you don’t have to invest a ton of money to get a quality solar generator. You can build one right in the comfort of your home.
All you need is a simple guide, the right supplies, and tools. We’ve explored the benefits of making a DIY solar generator and provided a comprehensive guide on how to build one. Let’s jump right in.

Getting a reliable, high-quality solar generator will cost you a pretty penny. You see, the generators that come with up-to-date features and are manufactured by top brands also come with a hefty price tag.
If you’re on a tight budget, the alternative would be to settle for a cheaper model that may not cater to your needs.
It doesn’t have to get to this. You can build your own DIY solar generator and enjoy similar benefits without compromising on quality. Here’s why DIY solar generators may be ideal for you.
1. Solar Generators are Safer than Gas Generators
If you’re searching for a safe and eco-friendly way to run your home or RV, solar power is the way to go. Therefore, if your budget won’t allow you to buy a ready-made solar generator, don’t settle for conventional generators. Build your own.
You can use it indoors and outdoors without worrying about leaks, fires, or leaks.
2. They’re a One-Time Investment
Solar generators require little to no maintenance. Ready-made options are built to last and often come with a two-year warranty or longer, depending on the brand. The only thing you’d have to do to keep the generator in tip-top condition is:
- Check the panels after foul weather
- Clean them semi-annually
- Ensure nothing is blocking the sunlight from reaching the photovoltaic cells
However, these generators are not indestructible. The generator can malfunction. When this happens, you’ll have to call in an expert for repairs. This may also happen with a DIY generator. However, the difference is that you’ll be able to fix the problem because you built the generator. This further cuts back on your investment costs. Furthermore, you can invest in better parts because you don’t have to factor in labor costs.
3. Repairs are Hassle-Free
As we’ve mentioned, building a DIY solar generator is a good idea, especially when it comes to regular maintenance and repairs. When you understand all the components and how they were put together, it’s easier to swap out old parts for new ones and fix whatever is broken. The only cost you’ll incur in this is the amount required to get the replacement parts.
Otherwise, you’d spend a ton of money on paying an expert and getting the repairs. Do the math. DIY solar generators keep the money in your wallet for the long haul.
4. You Decide How Much Power You Get
Most solar ready-made generators have enough power to power the average home and cater to your needs. However, if you need to power your entire home or get more power than usual, you’d need to invest in a couple of solar generators to achieve this.
There is no need to do this because you can build a DIY solar generator that provides all the power you need.
5. You Cut Back On Costs

One of the top reasons to consider making a homemade DIY solar generator is the savings on costs. For starters, a solar generator greatly reduces your energy bill. Because this generator is powered by the sun, you never have to worry about electricity bills when using it.
Furthermore, you won’t have to worry about a hefty upfront investment because building your own further cuts down the costs. And as we’ve mentioned, the repairs will be so much easier and cost less with a DIY solar generator.
6. The Project is Satisfying
Building your own solar generator also gives you the opportunity to learn a ton about technology that you probably didn’t know about prior to your build. Not to mention, completing such a project and seeing the generator up and running is extremely satisfying.
Knowing that YOU made it deserves several pats on the back!
How to Make a Homemade Solar Generator (Parts & Tools)
Building a DIY solar generator is a project you should take seriously. Gather all the parts, components, and tools you need before you begin. Also, go through all the steps before attempting anything to ensure you’re up for the task.
If you’d like your family to help, ensure they understand the steps as well. It’s also advisable to explain all the components, parts, and tools to them before the project begins to eliminate room for error. Fortunately, we’ve provided a simple step-by-step guide that will have your DIY generator up and running within no time. Let’s get this show on the road.
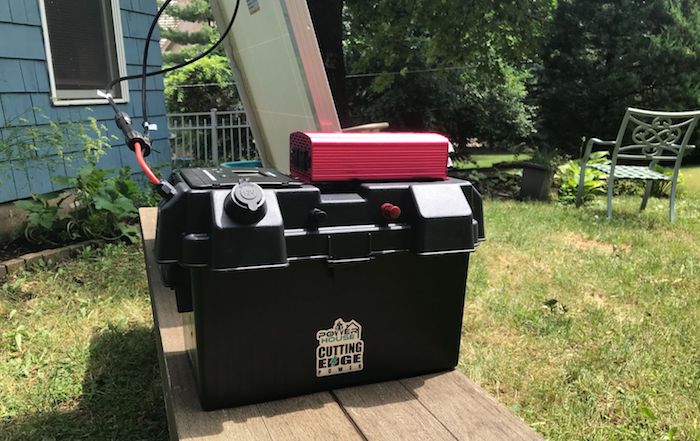
Solar generators are simple machines. These generators only require a few components to function correctly. However, it’s crucial to invest in high-quality parts for this project. The better the quality, the longer your generator will last and the fewer problems you’ll have with the machine. Below is a list of the components and parts you’ll need for this project.
1. Rugged Case
Invest in a waterproof, weatherproof, and all sturdy casing to hold all the components you need for the project. Some of the additional features to look for include:
- Rolling wheels
- Handles
- Lock security
- Space
Alternatively, you can invest in a toolbox that’s spacious enough to hold all your parts and tools. However, there should be some ventilation available to cool the components down when in use.
2. AC Solar Power Inverter
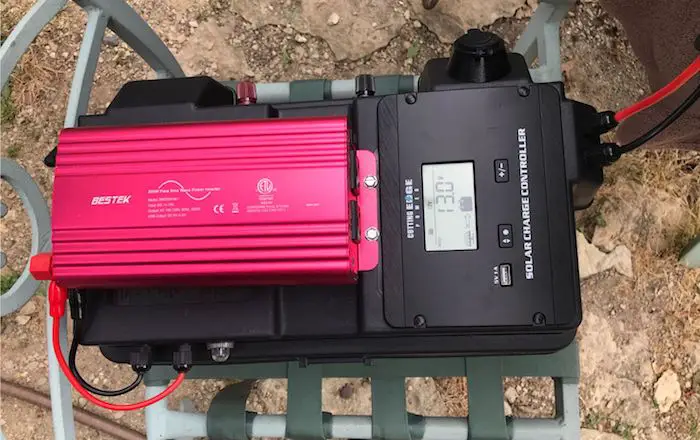
A solar power inverter allows you to transform the DC voltage stored in the battery to the AC voltage that appliances use. Look for a solar power inverter with:
- A healthy amount of continuous and surge power
- Overload protection
3. Solar Charge Controller
A solar charger controller helps you regulate the amount of energy the battery is getting from the solar panels, thereby helping you prevent overcharging.
If you’re building a portable solar generator, ensure the casing of the solar charge controller is moisture-proof for optimum performance in any weather and to prevent damage.
4. Solar Panels
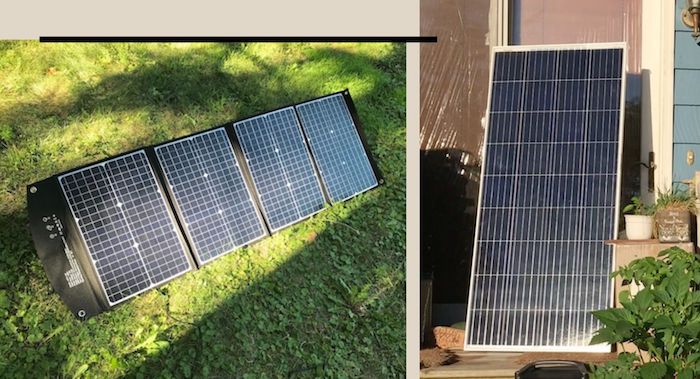
Solar panels are a crucial part of your DIY solar panels. The panels absorb the sun’s energy and supply it to the battery. This part will be the most exposed in the generator. Therefore, you can’t afford to compromise on quality. Get high-quality solar panels that are built to last.
Lightweight, foldable, and portable solar panels are excellent options for portable solar generators. With these features, you’ll have an easy time packing the panels and generator when you’re going on a camping trip or need the generator on the go.
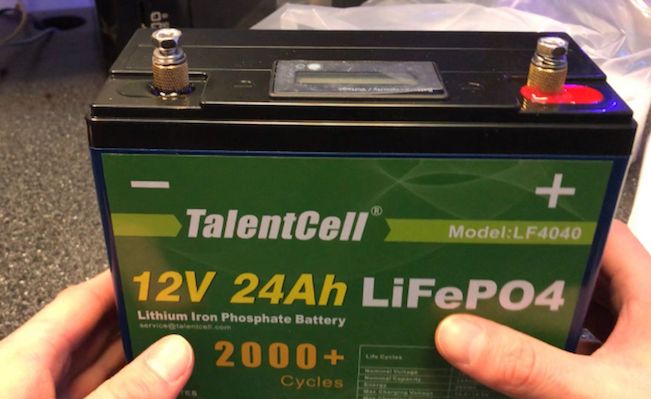
5. Batteries
The generator will also need a battery to store solar energy. There are a plethora of options to choose from. However, the typical solar generator uses one of three types:
- Deep-cycle lead-acid
- Lithium-ion
- Lithium-iron-phosphate (LiFePO4)
| Lead-Acid | Lithium-ion | LiFePO4 |
|---|---|---|
| Easily recycled | Compact and lightweight | Heavier than lithium-ion |
| It lasts much longer on a low charge | Highly efficient | Longest-lasting (longer than lithium-ion) |
| Well-proven technology | You can charge it partially without long-term capacity loss | Safer & less toxic components than the others |
Before you decide which one to go for, explore both options and see which one caters to your energy needs the best. Also, explore different brands for quality purposes and price comparison.
Just because a battery is expensive doesn’t mean it’s high-quality. Don’t forget to read user reviews to get an idea of what to expect.
6. Battery Maintainer
A battery maintainer is a small charger that supplies your battery with a small amount of electricity when it’s been sitting out unused for a long time.
This is a crucial component to invest in because it extends your battery’s life. Without it, you’d have to repurchase batteries quite often.
7. AC, DC, and USB Ports
An AC power inlet is the external inlet on the hard case. Make sure the power inlet you purchase doesn’t require any cable modifications or hard wiring. It’s also best to go for one that’s 18 inches long and above.
If you want to add USB and 12V ports, make sure that they also don’t require cable modifications.
8. Additional Cables (If Needed)
Although several components typically come with cables, you may need additional wiring to connect everything together. For solar charging, MC4 connectors may need to be purchased if the charge controller you get doesn’t come with one.
Want to Make It Easier? Get a Solar Kit
If this is your first time building a solar generator and you’re not sure how to go about getting all the separate components, it’s advisable to get a solar kit. Solar kits provide a reliable shortcut that allows you to build the generator with ease.
Most kits include:
- Solar panels
- Charge controller
- Solar adapter kit
- Cables
- Connectors
- Mounting brackets
These are the primary components you need to mount and connect your solar panel. You can get the other components listed above separately since it won’t make much of a difference in terms of compatibility.
Just make sure you invest in high-quality parts because the goal is to make a durable solar generator.
Tools
Apart from the above components, you’re also going to need a couple of tools to complete this project successfully. These include:
- Utility knife
- Files
- Cordless drill with grinding extensions and drill bits
- Automatic wire stripper with cutter
- 111-240V hot glue gun
- Flat and Torx screwdrivers
DIY Solar Generators – Prep & Build
Now for the part you’ve been waiting for – building your own solar-powered generator. Once you’ve assembled all the parts and tools, follow the steps below to build the generator.
Remember, it’s crucial to understand each step before attempting anything. Any mistake can interfere with the functionality of the generator or make it impossible to run it all together.
Therefore, follow each step carefully for the best results.
Determine Your Energy Needs
The first thing you need to do is to calculate your energy needs. Energy needs vary from person to person depending on what they plan to use the generator for.
Do you plan to use it as a backup when the electricity goes out? Are you planning to use it to power your entire RV? Or is it your only source of power in your home?
The answer to these questions will give you an idea of how much energy you’ll need, thereby informing you on what type of solar generator you need to build.
Use the power ratings of some of the typical household items below to estimate your energy needs.
- Smartphone recharge: 6-10W
- Ceiling fan: 10-40W
- LCD Monitor: 40-100W
- Laptop recharge: 50-120W
- TV: 150W
- Drill (1/4 inch): 250W
- Coffee machine: 1,000W
- Toaster oven: 1,200W
Test the Equipment
Before you begin assembling any parts, ensure the equipment is working as it should.
First, test the panel and charge controller. Here’s how to go about it:
- Plug the two pigtails cords on the panel in the appropriate (+) and (-) sockets on the charge controller.
- Next, hook the controller to the battery.
- Hooking the negative cable to the charge controller should result in a green light on the controller— this shows that the battery is charged.
- Afterward, turn the panel towards the window, making sure it’s picking up sunlight. If the panel is working correctly, a green light on the charge controller should come on. This indicates that the panel is charging the battery.
Next, you need to test the inverter by following the steps below:
- The inverter comes with red and black cables. Hook up the cables on the inverter terminal, and hook the other end of the cables on the battery.
- Connect the positive cable first.
- To test the inverter, switch it on and plug in a home appliance. Ensure the appliance has a decent load. A perfect appliance for this test is a fan.
You also need to test the battery maintainer. Follow these steps:
- Disconnect the battery from the controller.
- Next, hook the maintainer cables to the appropriate poles of the battery.
- Again, start by connecting the positive side first.
Lastly, test the surface mount contactor by following the steps below:
- Plug the extension cord from the wall socket.
- If the surface mount contactor is functioning as it should, both green and red lights on the maintainer should come on.
- After a few seconds, only the red should remain – this indicates that the device needs charging.
Build the Generator
Once you’ve ensured all the parts are working correctly, it’s time to build your DIY solar generator.
Here’s where you mount all the equipment together, do all the wiring, and watch as your DIY generator comes to life. Here’s what you need to do:
1. Prepare the Case
- The solar generator is plug-and-play. For this reason, all the outlets should be accessible without opening the case.
- It’s best to use masking tape to make initial marks. This way, you can easily make adjustments if needed without leaving permanent marks on the casing.
- Begin by measuring the actual size of each hole and tracing it to the case. When you start cutting, it’s advisable to cut smaller holes and enlarge them if needed. This way, you’re not making bigger holes than needed.
- For round holes, switch between drill bits and hole saws. A vibrating multi-tool with a plunge-cutting blade works best for straight lines. However, if you want to trim or adjust the holes, it’s best to use a pneumatic die grinder. Utility knives or files work similarly if you prefer hand tools.
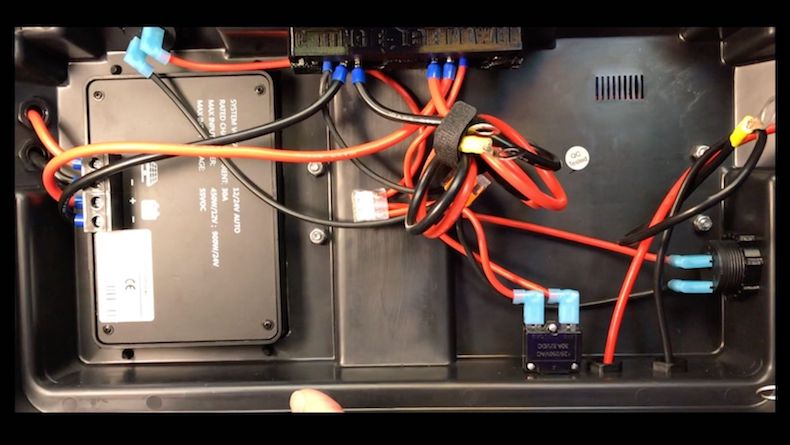
2. Mount the External Components
The following mounting instructions can be found in this YouTube video by ModernSurvivalists. I broke down the majority of these steps in the text below as well. The video shows how to mount components of a solar generator in/on the case, or shell, of the system.
After cutting the holes, follow the component mounting steps below:
- Line the edges with black silicone sealant. This step helps to keep the box interior waterproof. When the silicone begins curing, carefully place the light in its slot. The 120V AC charging port features a rubber gasket. Therefore, you don’t need silicone for that.
- Repeat these steps for the rest of the components on the other side of the hard case.
- You’ll need the silicone sealant for the inverter remote control panel as well. Secure the panel with self-tapping screws.
- Mount the weatherproof cover and GFCI outlet using heavier #10-24 machine bolts. However, don’t bolt them yet. You need to wire everything first.
- If the solar power inverter has a peak capacity above 4,000 watts, a 12 gauge wire for the GFCI outlet is a must-have. Always give yourself an excess of about 4-5 inches of wire.
3. Mount the Battery
- Because the batteries are the heaviest components, it’s best to place them in a corner closest to the case wheels. You can have the battery facing in any direction. However, ensure it’s stable in all the directions that the case is likely to be used.
- Next, drill two holes for the battery mount bolts, but don’t fix the battery in place until all the components are ready for mounting.
4. Mount the Solar Power Inverter
It’s crucial to position the AC pure sine wave inverter in a way that its outlets are near the GFCI weatherproof outlet and the 12V cables within reach of the battery.
- Mark the bottom holes for the inverter.
- Next, mount the hardware using #10-24 machine bolts with washers, spring washers, and nuts.
- Lastly, plug the pigtail cord from the GFCI outlet into one of the inverter outlets and the other end of the inverter remote control cable into the back of the remote switch panel.
5. Mount the Charge Controller and AC Battery Maintainer
The best place to position your AC battery maintainer is on the back wall of the system. It should be near the LED light that you mounted first. Then, you can connect the power cord to the female extension of the waterproof 120V AC cord socket you installed before on the outside of the case. Once you have mounted all external and internal components, the final step is wiring everything together.
Follow the steps below to complete the wiring successfully:
- Connect the outlet plug to the inverter. Make sure you use a 12-gauge wire (12 AWG) to connect the inverter to the battery and the battery to the solar charge controller.
- Next, plug in the extension cable of your solar panel to the solar charger (12 AWG).
- You will need three fuses:
- One between the solar panel and the charge controller
- One between the charge controller and the battery
- One between the battery and the inverter
This video provides a detailed wiring procedure.
DIY Solar Generators: Building Your Ideal System Requires Patience
As you can see, building your own solar generator can be simple or sophisticated depending on what you’re looking to get out of it. Either way, it requires both proper planning and assembly to get your system working effectively.
Therefore, whether you’re doing the project alone or getting help, ensure everyone understands the steps and familiarizes themselves with all the different components before you begin. If this is your first solar generator project, it’s best to invest in a solar generator kit.
These come with all the components you need, eliminating the hassle of finding compatible separate parts from different brands.
Also, remember to prioritize quality. Investing in high-quality components increases the longevity of the machine and ensures it runs without any problems.
Read user reviews and compare different brands to find the right parts and components on the market.
For DIY solar generator builds, I highly recommend visiting diysolarforum.com. There, you’ll find a community of people to connect with as well as several resources for your DIY project.
Limitations of Solar Generators
Let’s review some factors that limit the use of portable solar generators.
1. They Have a Limited Output
Portable solar generators are not complete home grid power replacements.
If that were the case, everyone would be rushing to buy and live off of solar generators.
Some large and expensive solar array systems can offset all your energy needs. But this takes thousands of dollars, permits, and contractors to achieve this.
A portable backup generator can be inexpensive and powerful, but it won’t provide the same amount of electricity as full-blown solar systems.
Gas generators are also much more powerful than most solar-powered generators.
But, as mentioned earlier, you’ll need to weigh the power differences out with the fact that solar generators don’t need fuel, emit no noise, and can be used indoors with ease.
While the upfront costs for a solar generator may be more than a gas-powered one, consider long-term costs as well.
Whether you choose a gas or solar-powered generator for backup power, you need to prioritize the option that will provide you and your family with the best outcome.
Figure out which appliances and devices are essential and which ones you can do without.
Remember that if you are buying an emergency backup power system, you will have power for only a few emergency necessities.
2. They Are Expensive

We already touched on this, but solar generators are an investment. The best generator will cost more upfront.
Remember that fuel-powered generators have continuing fuel costs that need to be considered.
The more your solar generator is used; the more affordable it becomes. This is true when compared to the use of fuel-powered generators.
Also, there are several other intangible costs to consider such as:
- The cost of running out of fuel
- Harmful emissions
- Excessive noise
- Fuel stowage concerns
When considering which type of generator to buy, think long-term. Decide whether the upfront investment is the best option for you.
3. Not Instantly Recharged
It takes time for a solar panel to recharge the battery. The power they collect varies depending on the amount of sunlight available.
Solar panels are greatly affected by the angle of the sun to their surface.
If your panel is in a fixed position, you will get a curve of power production considering the movement of the sun.
It will start out with little power, increase to a peak, hold at this position for a while, and then go flat.
The hope is that you can be able to generate sufficient power during this time to run your appliances and charge your battery.
You can do this by storing backup power in the battery overnight.
Then, use the daylight to charge the generator while it uses the previously stored energy throughout your home.
Consider the appliances you need and how often they are used. Aim to be as power-conservative as possible, unless you plan on investing in many batteries and generators.
The more panels you have, the more power you can produce in a given period.
But if your battery charges fast, you will need to have extra batteries to store any extra energy.
As mentioned earlier, make sure that you know the maximum input for the battery and charge controller you intend to use so you do not burn them out with too much solar power.
For more information on sizing your solar generator, here are a few of my articles that go into more detail:
- What Size Solar Generator Do You Need? (Sizing Guide)
- What Size Charge Controller Do I Need? (50-400W)
Things to Consider Regarding Solar Generators & Solar Panels
Below are some final questions for you to ponder in addition to my advice.
Does the Solar Generator Come With a Solar Panel?
- Some solar power stations do not come with solar panels.
- Confirm to see if the package has a solar panel.
If the package does not include the solar panel, then confirm if the power station can connect to solar panels from other brands or if it only operates using proprietary solar panels.
How Much Solar Power Do You Need?
Calculate the total power ratings of all your gadgets (tablets, phones, mini coolers, laptops, drones, electric stoves, etc.) that want to include in your off-grid setup.
Odds are that you will not be able to power all of your gadgets simultaneously using the solar generator.
Thus, you will have to prioritize powering those devices that are most important first.
For a home backup solution, it is best to invest in a heavy-duty solar generator.
Will Solar Energy Be Enough for You?
Usually, charging a solar generator can take hours, so I’d be sure to keep the battery charged in case of an emergency. Bear in mind that there are some solar generators that you cannot use while they are charging.
Even with a large solar generator setup with several solar panels and batteries, weather can affect the recharging rate of your system significantly. If you live in an area where cloud coverage occurs frequently or sporadically throughout the year, it would be a good idea to also own a gas-powered generator in case of an emergency.
Do You Know How the Whole System Works?
It’s essential to figure out how solar generator systems work before buying one.
- Conduct research on the different types of batteries available
- Research the wattage of the devices that you plan to power
- Know how the panels, charge controllers, inverters, and batteries work in unison to easily incorporate it into your lifestyle
Find What’s Right for You
Affordable, eco-friendly, and versatile solar-powered generators are a must-have for all enthusiastic campers, RV owners, and homeowners.
Be sure to research your options extensively so you can make the best decision for your wants and needs. My best advice for you is to take your time researching solar generators. Whether you intend to create a DIY system or buy one, continue to focus on the basics.
Most of the foundational questions you should ask yourself include:
- Will it charge fast enough?
- Will it output enough power?
- Does it have the outputs that are ideal for my needs?
- Is the battery large enough to keep the power running?
- Does the battery have a long cycle life?
Solar generators can seem ultra-complicated (especially for DIY generators), but as long as you can keep it simple and focus on the core elements, you’ll eventually be able to know precisely what you need for a reliable off-grid power solution.
Here are some more resources for you: